
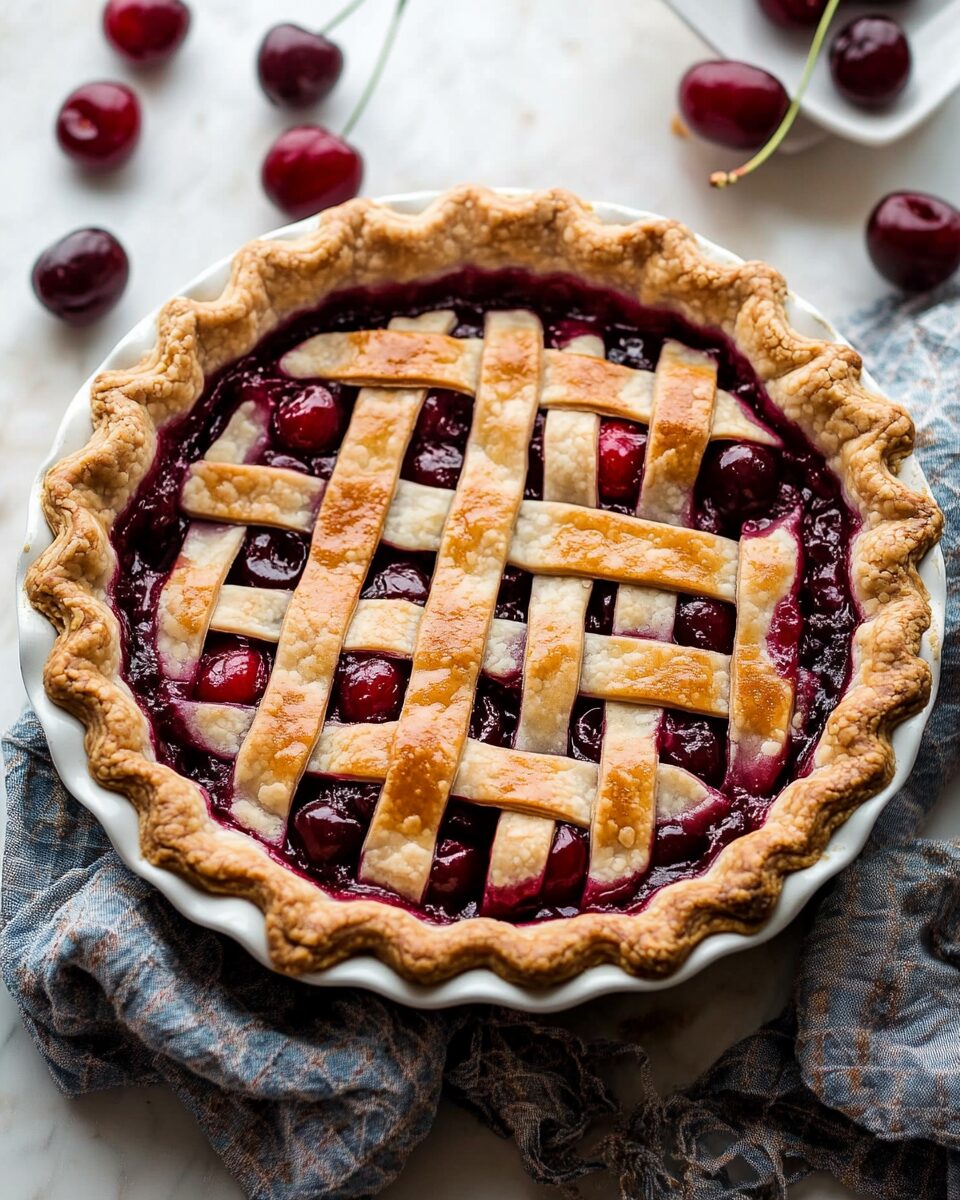
This homemade cherry pie features a perfectly sliceable, thick almond-hinted cherry filling encased in a golden brown, buttery, flaky pie crust. This classic dessert is perfect for showcasing fresh cherries and is sure to impress at any gathering
FULL RECIPE:
Ingredients
Pie Crust:
- 2 and 1/2 cups (315g) all-purpose flour
- 1 and 1/4 teaspoons salt
- 6 tablespoons (90g) unsalted butter, chilled and cubed
- 3/4 cup (150g) vegetable shortening, chilled
- 1/2 cup (120ml) ice water
Cherry Filling:
- 5 cups (about 1.5 lbs or 720g) fresh sweet cherries, pitted and halved (quarter some for varied texture)
- 1 cup (200g) granulated sugar
- 1/4 cup (30g) cornstarch
- 1 tablespoon lemon juice
- 1 teaspoon pure vanilla extract
- 1/4 teaspoon almond extract
- 1 tablespoon (14g) unsalted butter, cut into small pieces
For Assembly:
- 1 egg, beaten
- Coarse sugar for sprinkling (optional)
Directions
- Prepare the Pie Crust: In a large bowl, whisk the flour and salt together. Add the chilled butter and shortening. Using a pastry cutter or two forks, cut them into the flour until the mixture resembles coarse crumbs. Drizzle in the ice water, one tablespoon at a time, stirring gently until the dough begins to come together. Divide the dough into two equal parts, shape each into a disc, wrap tightly in plastic wrap, and refrigerate for at least 2 hours (or up to 5 days).
- Prepare the Cherry Filling: In a large saucepan over medium heat, combine the pitted cherries, sugar, lemon juice, and a pinch of salt. Stir occasionally until the cherries release their juices, about 5 minutes. Mix the cornstarch with 2 tablespoons of water to create a slurry, then stir it into the cherry mixture. Bring to a boil, stirring constantly. Once boiling, cook for an additional minute until the mixture thickens. Remove from heat and stir in the vanilla and almond extracts. Allow the filling to cool completely at room temperature.
- Assemble the Pie: On a lightly floured surface, roll out one disc of chilled dough into a 12-inch circle. Transfer it to a 9-inch pie dish, trimming any excess overhang. Pour the cooled cherry filling into the crust and dot with small pieces of butter. Roll out the second disc of dough and place it over the filling. Trim any excess, fold the edges under, and crimp to seal. Cut a few slits in the top crust to allow steam to escape. Brush the top crust with the beaten egg and sprinkle with coarse sugar, if desired.
- Bake the Pie: Preheat the oven to 400°F (204°C). Place the pie on a large baking sheet to catch any drips and bake for 20 minutes. Reduce the oven temperature to 375°F (190°C) and continue baking for an additional 30-35 minutes, or until the crust is golden brown and the filling is bubbling. If the edges begin to brown too quickly, cover them with foil or a pie crust shield.
- Cool and Serve: Remove the pie from the oven and place it on a wire rack. Allow it to cool completely, at least 3 hours, before slicing and serving. Serve with a scoop of vanilla ice cream or a dollop of whipped cream, if desired.
Nutrition Facts
- Serving Size: 1 slice (1/8 of 9-inch pie)
- Calories: Approximately 486
-
Total Fat: 22g
- Saturated Fat: 5.4g
- Trans Fat: 0g
- Cholesterol: 0mg
- Sodium: 344mg
-
Total Carbohydrates: 69g
- Dietary Fiber: 2g
- Sugars: 5g
- Protein: 5g
- Calcium: 18mg
- Iron: 3.3mg
- Potassium: 139mg
The History of Cherry Pie
Cherry pie has deep roots in American and European culinary traditions. The earliest cherry pies date back to the Middle Ages in England, where fruit pies (or “puddings”) were a popular way to preserve seasonal fruits. English settlers brought their pie-making techniques to America, where they adapted recipes based on locally available ingredients. Cherries, particularly tart cherries, flourished in North America, making them an ideal choice for pies. By the 19th century, cherry pie had become a staple in American households, often featured at holiday gatherings and summer picnics. The dessert remains an iconic part of American culture, with National Cherry Pie Day celebrated annually on February 20th.
Why This Cherry Pie Stands Out
This particular cherry pie recipe is a step above the rest due to its perfect filling consistency and its ultra-flaky crust. Many cherry pies suffer from a runny or overly thick filling, but this recipe ensures the right balance, thanks to the correct ratio of cornstarch, sugar, and cherries. The addition of almond extract enhances the cherry flavor, creating a richer taste experience. Another factor that sets this pie apart is the homemade crust. Store-bought crusts often lack the same tender, buttery texture, and making your own from scratch significantly improves the overall taste. The dough is carefully prepared, chilled, and rolled out to create a crust that is both sturdy and flaky.
Choosing the Right Cherries
The type of cherries you use can dramatically impact the flavor and texture of your pie. Here are the most common types used in cherry pie recipes:
- Sweet Cherries (Bing, Rainier, Chelan): These are the cherries most commonly eaten fresh. They have a high sugar content, making them naturally sweet and juicy. If using sweet cherries, the sugar in the recipe may need to be adjusted.
- Tart Cherries (Montmorency, Morello): These cherries are the traditional choice for classic cherry pies because of their bold tartness, which pairs well with sugar to create a balanced flavor. They also tend to release more juice, so thickening agents like cornstarch are essential.
- Frozen Cherries: If fresh cherries are out of season, frozen cherries are a great alternative. Just be sure to thaw and drain them to prevent excess moisture in the pie filling.
- Canned Cherries: While convenient, canned cherries are often packed in syrup, which can make the filling overly sweet. If using canned cherries, choose ones packed in water or their natural juices.
How to Achieve a Flaky Pie Crust
A flaky pie crust is the hallmark of a great cherry pie. Here are a few essential tips to ensure success:
- Use Cold Ingredients: The key to a tender, flaky crust is keeping the butter and shortening cold. When these fats remain solid in the dough, they create air pockets during baking, resulting in a light, crisp texture.
- Handle the Dough Gently: Overworking the dough can develop too much gluten, leading to a tough crust. Mix the ingredients just until combined.
- Chill the Dough: Resting the dough in the refrigerator before rolling it out prevents shrinkage and helps the fats firm up, which improves flakiness.
- Use the Right Rolling Technique: Roll the dough outward from the center in a circular motion to maintain even thickness. Avoid stretching the dough, as it will cause it to shrink during baking.
- Brush with an Egg Wash: For a beautiful golden-brown crust, brush the top of the pie with a beaten egg before baking.
Common Mistakes and How to Avoid Them
Even experienced bakers sometimes struggle with cherry pie. Here are some common mistakes and how to avoid them:
- Runny Filling: If your pie filling is too liquidy, it likely needs more thickener or longer cooking time. Be sure to let the filling cool completely before adding it to the crust.
- Soggy Bottom Crust: To prevent a soggy crust, bake the pie on the lower oven rack and use a glass or metal pie dish instead of ceramic. You can also preheat a baking sheet and place the pie dish on top to encourage crisping.
- Overly Tart or Sweet Filling: Taste the cherries before making the filling. If they are very tart, add a little extra sugar. If they are very sweet, reduce the sugar slightly to maintain balance.
- Shrinking Crust: Always chill the rolled-out dough in the pie dish before baking to prevent shrinkage.
How to Store and Reheat Cherry Pie
Cherry pie can be made in advance and stored properly to maintain its delicious flavor and texture.
Advertisement
- At Room Temperature: If you plan to eat the pie within a day or two, cover it loosely with foil or plastic wrap and keep it at room temperature.
- Refrigeration: For longer storage, cherry pie can be refrigerated for up to 5 days. Cover it tightly to prevent it from absorbing any odors from the fridge.
- Freezing: To freeze a fully baked pie, wrap it tightly in plastic wrap and aluminum foil before placing it in the freezer. It can be stored for up to 3 months. To reheat, bake it at 350°F (177°C) for 20-25 minutes.
Pairing Cherry Pie with Other Desserts and Drinks
Cherry pie is versatile and pairs well with a variety of complementary flavors:
- Ice Cream: A scoop of vanilla or almond-flavored ice cream enhances the richness of the cherry filling.
- Whipped Cream: Light, airy whipped cream balances the dense, sweet pie filling.
- Coffee or Tea: A hot cup of coffee or black tea cuts through the sweetness and enhances the pie’s flavors.
- Wine Pairings: A sweet dessert wine like Port or a fruity red wine like Pinot Noir complements the cherry flavor beautifully.
Conclusion
Homemade cherry pie is a timeless dessert that combines the best of sweet and tart flavors with a rich, flaky crust. Whether you use fresh, frozen, or canned cherries, the key to success lies in achieving the right filling consistency and mastering a buttery crust. This dessert is more than just a recipe it’s a tradition that brings people together. Whether you’re making it for a holiday, a special occasion, or just because you’re craving something sweet, this cherry pie is sure to impress. With proper technique and the right ingredients, you can create a show-stopping dessert that will be remembered long after the last slice is gone.